Labels

Showing posts with label General banter. Show all posts

Thursday, August 23, 2012

My Mountain - Thankyou


On Oct 27th 2007 My Mountain opened its doors in Brunswick with the ambition of becoming Australia's best mountain bike store.
Within a couple of years, we realised that, like us, many mountain bikers liked to get out on road bikes as well so we started to introduce road bikes into the store while continuing to refine and improve our offering.  Despite many changes, our ethos has remained constant- we provide the best possible customer service, the right bike, the right fit and build our bikes to the highest possible standards.  We have come a long way since those first days when we had a bit of P & A on the walls and a handful of bikes.  We have continually studied suspension setup and bike fitting, while logging countless hours on different bikes so that we understand what type of bike would fit particular types of riders.
 
We have always known we do things differently, but have always liked that fact.  We never wanted to be the biggest or to sell the most.  We have just continually looked for better ways to get people out on bikes so they can experience the same love of bikes that we have.
 
Oct 1st 2012 marks another major milestone for My Mountain. Just short of five years after opening, I will hand the reins over to Tim Wilson.Tim's enthusiasm for bikes is contagious and fits My Mountain well in every way.  Coming from a DH background and working in another iconic Melbourne store for 15 years, Tim is set to make My Mountain even better yet.  I'm extremely excited for Tim and the store and look forward to joining many of you on the customer side of the fence. 
 
So over the next six weeks, I hope to catch as many of our regular customers as possible to thank person.  I truly appreciate everyone's support over the last five years and feel privileged to have been involved with such a group of fantastic people. 
My Mountain as a store is made up of enthusiastic/ knowledgeable staff, a great group of customers who share our vision and enjoy the relationship they have with us, other riders, and of course their bikes.  As the owner of My Mountain, I have been lucky enough to know each and every person associated with the store and have gained great satisfaction in the way we have been able to bring people together to enjoy the outdoors, get muddy, and in one case that we know of, meet their future husband/ wife.  Keep an eye out for ride days, social events, and Crazy Crusty Deals between now and Oct 1st.  It's going to be fun!


Wednesday, June 27, 2012

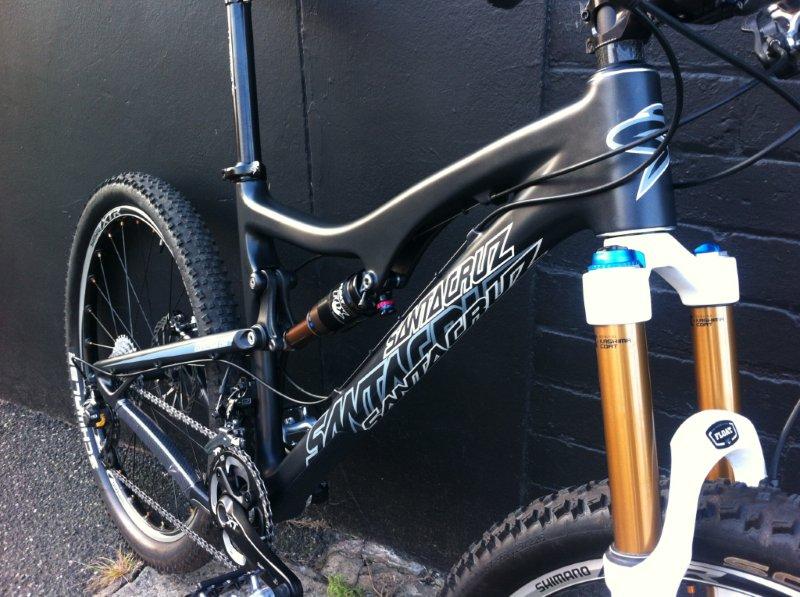
Santa Cruz Blur TRC Ex-demo bike sale


We have medium and large Santa Cruz Blur TRC ex demos for sale. Both bikes are in amazing condition and have done less than 300k's. These are a blast to ride, corners like it's on rails with a geometry that gives amazing confidence riding technical fast terrain, all this fun weighs only 11.4kgs in a medium size.

Both bikes have the same build: Full Shimano XT Groupset (3 x 10), XT Ice Tech brakes, DT Swiss wheels, Fox Float 130 RLC Kashima forks and Kashima RP23 shock.

Give us a call or drop in for pricing and a test ride.


Monday, May 7, 2012

Rumblefish rolls to victory!

In an update to a previous story about the biggest bike we have ever sold, it is now a race winner! Ronn is the proud owner of a 23" Trek Rumblefish Pro, Trek's 120mm travel 29er. In his first race aboard the new rig Ronn placed first, perfect preparation for the Red Centre 5 day enduro which begins next week. Good luck Ronn!


Friday, April 20, 2012

Santa Cruz Blur LTc - good for the soul


It had been a long week packed with all the stresses a busy week can bring. I was tyred, cranky and a bit over it, so needed something to remove me from the world and re-charge the batteries.  A solo mountain bikes session was just what the Dr ordered, and so I decided I would sneak off for some quality time with myself, a bike, some nice trails and fresh air.  So once that was decided I had but two decisions to make; where to go, and what to ride.  The where to go was a foregone conclusion as it hadn’t been raining for a couple of weeks and I had received word that the trails at Wombat state forest were in great condition. So Wombat Forest it was to be.  Now all was left to decide was what to ride, a great conundrum to have.  One of our good Customers Dave had just pulled the trigger on a new Santa Cruz Blur LTc and the frame was hanging up in store waiting to be built.  At the same time we had a medium Blur LTc demo bike sitting on the floor which I took as an ordained sign.  A Blur LTc, myself, and some great trails on a Sunday morning….life is great!

Having not ridden a Blur LT before I was pretty excited to see how the Santa Cruz suspension would suit this type of bike.  The 140-160mm travel range is an interesting category as the character of a bike can change dramatically by the geometry that is matched with the travel.  Slack and short, and you have yourself a min-downhill type of bike.  Steeper angles, with a longer cock-pit gives you a trail bike with buckets of capabilities, and that’s exactly what the LTc is.  Light, snappy, fun, with some extra travel in its back pocket for when you decide to hit up some of those bigger obstacles.  Of all the SC bikes I have ridden the Blur LTc is by far my favourite. For me it felt like one of those magical bikes that you could do just about anything on. And if you can only have one bike….well heck, make it a lightweight, responsive 140mm trail bike.  Race, all day epic rides, those 1 metre drop-offs.  It loves it all, and I love it back as the best Santa Cruz ever.

So is this post about the bike, the ride, or the combination of the two and what it can do for your sanity.  I think it’s the lot. I thought the bike was the most capable SC bike I have ridden as far as “one bike to rule them all” goes and it helped me ride away the stressed of the world for a whole Sunday morning delivering me back home, happy, content and muddy with a smile on my face.  So although not everyone is lucky enough to be able to jump on new and different bikes all the time, everyone has the ability to get away from it all and enjoy some quality time with just you, your bike, and the trail.  So get out there, you will feel better for it! 

Friday, April 13, 2012

There's big and then there's BIG


A couple months ago we had a gentleman call us from the city of Alice springs with some very specific requirements for his next bike. First of all it had to smooth out the rough and rocky terrain of the red centre, we thought awesome try a 29'er. Second it had to be tougher than his previous bike which was an ultra light XC race weapon, again our good friend Gary Fisher had the goods and we pointed him towards the Trek Rumble Fish. Finally, the bike had to fit and that's when we hit a snag.... The problem? Our customer just so happen to be 6'4' and all arms and legs. After a few emails back and forth and a few measurements of his current bike we had managed to decide on his correct size. TWENTY THREE INCHES!!!!! Those of you who have been in store and seen our 19' Rumble Fish will know that this is already a monster of a bike. The issue we had is that the good folks at Trek also know how big a bike this is and decided to only produce three in that size, world wide. Some how we managed to secure the bike through friends of friends of friends and it was in the store ready to be built, fitted and set up. Ron is now currently road tripping his way back to the red centre hitting any trails he can along the way, he also had a custom sticker made up for the bike which is now called the Ronnble Fish.


Monday, March 12, 2012

2012 World Cup DH Fantasy League

With the World Cup DH kicking off this weekend in Pietermaritzburg, South Africa, many of the My Mountain crew will be watching in anticipation of the exciting battle for the overall World Cup winner. Will Aaron Gwin defend his title this year? Will Sam Hill make a comeback from injury? How will Troy Brosnan perform stepping up from Juniors? Will the Athertons make their switch to GT worthwhile?

It's all part of the fun and games of the World Cup circuit, and as such we will be taking part in the Dirt Fantasy League to follow riders points over each round. The premise is simple; you get a 1 million pound budget to purchase 5 riders with (4 male, 1 female), and you monitor your riders performance over the 7 rounds. Whoever gets the most points gets the glory of being the best Team Manager in the universe - also, you go into the draw to win a Trek Slash!

All you need to do is register for free @ www.dirtfantasyleague.com
After you've chosen your riders, join up to the My Mountain league, enter the PIN number of 976 and we'll have our own internal battle for points with a prize at the end of the series.

May the games begin!!

Thursday, March 1, 2012

NZ Bound - Riding the Coppermine (Part 2)


Racing The Coppermine
Perhaps indicative of the special place the Coppermine Trail holds in the heart of Nelsonians, there is an annual race that is held each February for locals and out-of-towners called the "Coppermine Epic". Starting and finishing in the Maitai Valley with a 40km circuit over the Coppermine Saddle in between, the even attracts around 300 riders each year who battle it against the clock to see who is the fastest at both the long ascent and the technical descent. There are 2 variations of the race; the Epic and the Enduro, with the Epic taking a detour off the Dun Mountain Trail over Fringe Hill and along Black Diamond Spur. The photo on the left is of a makeshift bar that is setup on the day of the race to provide riders cresting the peak of Fringe Hill a cold refreshing beer courtesy of the local microbrewery, the Sprig&Fern. That climb is the steepest of the day, and for many riders the only thing getting them to the top of the hill is the thought of a lager to wet their lips. While I'm not usually the competitive type, the lure of riding in a mass-participation event and pinning my ride time against the local talent seemed to grab me, perhaps as I had started to develop a substantial appreciation for the trail itself.


At the top of the Coppermine Saddle is an
information board about the Mineral Belt and some of the local flora & fauna in the area. Just a little further on from the info board is a small clearing with a hardpack dirt trail leading away from a warning sign that states: "Some areas of track require extra caution", amongst other things. With the Dun Mountain Peak looming ahead, this is where your heart begins to beat a few thumps faster in anticipation of the amazing piece of singletrack that has been laid before you, filling up your veins with adrenaline and excitement that quickly sees you turn into a 12 year old kid again.

Dropping 700 vertical meters over the next 10km, the descent through Boulder Valley snakes its way along the mountainside through creek crossings, down ridgelines and around berm after berm. Checking your speed is super important to make sure you can roll around each switchback corner without overshooting or drifting off line, and over the course of the descent you find your exit speed improving with each corner. As soon as you ease off the brake levers, you feel your bike accelerate almost instantly as it gets sucked downhill by gravity, pulling you down into the loose and rocky trail surface.


Lining much of the trail on the way down are significant groups of rim-hunting baby-head sized rocks that occasionally collect around a creek crossing or a divot in the track. The first time I rode this surface was with some trepidation as I was conscious of smacking my wheels and/or frame onto a savage rock as I came hurtling down the trail a little faster than I would have liked. Having said that, I began to get used to my suspension and tyres absorbing the hits for me and finding I could more easily "float" over the irregularities in the trail if I stayed off the brakes. The reward is a high-paced chattery ride that sees you on the fine line between delirious fun and slightly out of control - it is very addictive!


On the same day I was riding with my Melbourne friend Andy, we both found out the consequence of riding at this slightly faster pace with slightly less ideal line selection when we both slammed our back wheels through one of the creek crossings lower down the valley. After barrelling through, I quickly pulled up to a stop to warn Andy of the crossing as another friend of mine had flatted on it only a week before. Before I could yell out "slow down Andy!", a 'hissing' noise exhausted itself from my rear tyre and I realised I had just made exactly the same mistake. Andy pulled up next to me and as we both laughed at my misfortune, his rear tyre began wheezing air from a snakebite puncture causing us to laugh even harder at our luck.

During the Coppermine race, I lost count of the number of riders who were sitting on the side of the trail with a pump in hand and various tubes and tools dangling off their arms as they furiously tried to get themselves back into the race. Tyre pressure is an important factor on the Coppermine, and (from experience!) I make a habit of bumping up 2psi from my usual tyre pressure to ensure my tubes have adequate protection from rocky edges on the trail. Luckily for me, I had no punctures or mechanicals on the day of the event, but there were many out there that weren't so lucky and saw many minutes lost to frantic tube swaps.

Overall, race day seemed to work out very well for me, with beautiful weather, great track conditions and a lack of any bike troubles or crashes. One rider walked away from the event with a broken collarbone, and many riders struggled through sole-destroying mechanicals or general exhaustion that saw some folks crossing the finish line about 5 hours after they had begun. of course, this all adds to the 'experience', but I was glad that I made an effort early on to get ahead of the main pack to avoid congestion on the first few sections of singletrack. Once the trail opened up to fireroad on the back of Tantragee Saddle I managed to get a steady rhythm on my way up the first section of the Dun Mountain railway. For a good 45 minutes I found myself climbing pretty much on my own, which is an odd experience when you're trying to ride at pace in a relatively quiet and serene environment. Getting out onto the Mineral Belt I found myself with a few riders in tow, and we rolled our way along the rocky trail up to the Saddle. Perhaps it was having some riders around me again, or it could have been the spectacular views that open up in the clearing, and it may have also been the fact that we were nearing Boulder Valley, but we all found ourselves 'whooping' and 'yee-haa-ing' as we neared the peak of the ride.

The Coppermine descent is the reason why every rider makes the 2 hour trek up to the saddle, as it is the ideal reward for all the hard work you've put in and is sure to motivate you on even the toughest days on the bike. Knowing that gravity was about to switch sides with me, motoring uphill doesn't seem to be as hard as it was earlier. While there wasn't a whole lot of traffic on the descent, I was quickly able to reign in a few leg-shaving roadies that were struggling with the loose surface, which was quite rewarding after they had overtaken me on the climb. With some of the trail stretching out into straight sections that allows you to build up some decent speeds, many riders cautiously feather their brakes to avoid breaking traction coming into the tight corners. The lower portion of the descent towards the Maitai Dam features a smoother riding surface that undulates along the valley that reminds me a lot of the Red Carpet trail at the Forrest MTB park in Victoria. Along this rollercoaster singletrack is where you can easily wind up to over 40km/h without pedalling and allow you to cover the last part of the descent with impressive speed. Just before you reach the sealed bitumen of the Maitai Road, the trail surface turns into loose shale rock that snakes its way around a mixture of large pine & native trees that surround you. With one last left hand switchback, you're spit out onto a clearing and onto the road, ready to head back.

While it's certainly not anyones favourite section of the loop, the stretch along the Maitai Valley is a good opportunity to stretch out the legs and rest your ankles and wrists that have been hanging on for dear life for the past 30 minutes. It actually happens to be a stunning piece of roadway as it follows the Maitai river along the valley and allows you take in the last remaining piece of wilderness before you get back into Nelson. Although I would normally cruise along this section, race day called for a higher pace, though my attempted 'drafting' behind a group of 5 didn't go so well, with me getting dropped like a tonne of bricks within about 50m. Shortly after, the course crossed back over the river and onto a dirt path for the remaining distance back to the finish line and finally through the singletrack section we had begun the race on earlier that morning. Legs burning, lungs hurting, I span my pedals madly through the open field towards the finish line, glad to have had a clean race with no particular upsets. And it was then that I was able to quantify my time around the venerable Coppermine loop; 2 hours and 18 minutes. Not really knowing what to expect, I was pleasantly surprised to find I had finished 2nd in my category and 8th overall in the Coppermine Enduro event.

For many riders, simply finishing the 40km trail is a feat in itself and there were many relieved faces crossing the finish line. While it was great to know what you can do when you're racing against the clock, being part of such an awesome event with a huge group of like-minded and passionate riders is really what the Coppermine is all about.
Perhaps one of my favourite parts of completing this ride is the after-ride visit to the local tavern; the Sprig&Fern. A Nelson institution and also one that is very popular with mountain bikers, the S&F is a micro-brewery pub that features about 14 different beers, ciders and other drinks on tap that they brew onsite such as the Alcoholic Lemonade (yes, it is as amazing as it sounds!). With a fush 'n' chup store next door that delivers food into the pub, there is no better place to reminisce the best parts of the ride and discuss where you could have been faster or improved your technique, whilst refuelling your body with delicious beer and food.
It's also a great midweek meeting place to discuss the following weekends riding plans and to work out the next chance you'll have to take on the Coppermine trail...

Thursday, February 23, 2012

Drivetrain Wars - The 10 Speed Battle of SRAM vs. Shimano (Part 2)

Continuing on from our previous drivetrain discussion, the second half of our review will be covering the Shimano 10 speed offerings available @ My Mountain, as well as alternative gearing options and how to choose the right setup for you and your riding style.

Shimano
In response to SRAM's release of the 2x10 XX groupset, Shimano hit back the following season with it's latest XTR drivetrain in a 10 speed guise dubbed 'Dyna-Sys'. However, unlike SRAM, Shimano debuted the groupset in 2 distinct flavours titled; Trail and Race, which provided riders with multiple choices for front cranksets, cassette ratios and derailleur options depending on their needs. The idea was to create a groupset that wasn't just designed for hardcore XC racers, but was also suitable for trail riders who valued the lightweight, high quality shifting and performance that is synonymous with the XTR name. While SRAM have been pushing the whole 2x10 system, Shimano are offering both 3x10 and 2x10 options in their XTR, Deore XT and SLX groupsets as they have recognised the importance of choice when it comes to gearing setup. Firstly, a quick rundown of the available 10 speed options from Shimano;

Shimano XTR: The absolute top of the tree in the world of Shimano, with intensively machined components for super crisp shifting and lighter weight. The HollowTech crankset lays the power down like no other and the Carbon/Titanium chainrings could be mistaken for a piece of art. Shifting is more positive on the M980 groupset compared to previous XTR drivetrains, but you still get silky smooth and stealthy shifting from the Japanese Juggernaut.
  • Buy Me: If you want the smoothest shifting available and value lightweight parts
  • Don't Buy Me: If you think replacing a worn Titanium cassette is cheap


Shimano Deore XT
Stepping up for 2012 with a redesign on the cranks, shifters and derailleurs, the Deore XT groupset sees some significant trickle down technology from the XTR line with the introduction of a double crankset. Like XTR, you get the choice of 'Trail' and 'Race', so you can choose how low or high your gearing needs to be. XT is known as "the standard" for mountain bikes, as aside from some carbon, titanium and a few grams, it is very close to XTR in performance.
  • Buy Me: If you need dependable components with a utilitarian appeal
  • Don't Buy Me: If you want sexy carbon on your bike or you're looking for the lightest component options


Shimano SLX
Also seeing the 10 speed Dyna-Sys treatment is the true workhorse of the Shimano lineup, SLX. While Deore XT continues to be whittled down to its lightest form yet, SLX takes a slightly burlier approach with its solid rear derailleur and beefy crankset that are likely to stand up to more abuse over more km's. Shifting performance is still Shimano-slick, but currently they only offer a triple crankset up front.
  • Buy Me: If you want bulletproof performance and you are hard on your gear
  • Don't Buy Me: If you want a dedicated 2x10 setup or you're counting grams


Choosing the right drivetrain setup for you
While that's all well and good, there's no need to drop everything and become a 'SRAM Fan' or 'Shimano Enthusiast', until you work out what drivetrain setup is best for you, your bike, your riding style and your riding conditions. As cliche as it may sound, it is not uncommon to see a weekend warrior heaving their way up a hill on a SRAM XX-equipped bike that is clearly geared to highly for their terrain and fitness levels. You can have all the carbon and acronyms in the world, but if you have to think, and we mean consciously think about your gears while riding, then you don't have a setup that works seamlessly for your conditions.

2x10
Without doubt the latest buzz in the mountain bike industry, the 2x10 drivetrain has had a real push by SRAM, first with the XX groupset and now with the X0 and X9 lines too. There are some clear benefits of running a double front crankset such as improved ground clearance, less front shifting, narrower Q-Factor and lighter weight. However, low gearing availability is not its forte and although those options are starting to become available, they are an aftermarket addition that can raise the initial costs up. Also, many full suspension bikes are designed to perform optimally around a 32t middle chainring, and so slapping on a 2x crankset with a 36 or 38t chainring will likely cause a certain amount of 'stiffening' of the suspension. Not a hugely noticeable issue, but worth mentioning nonetheless.
  • Who it works for: Anyone wanting to simplify their current triple setup should look at gearing options on a 2x10 system. If you don't think you'll miss the super low/high gears a 3x9 drivetrain offers, you could find a 2x10 setup to have more usable gears with less overall front shifting.
  • Who it doesn't work for: If you feel that having a 38t or 40t main ring is just too big to push for average trail riding, a dedicated 2x10 setup won't be ideal. Some terrain requires a super low 22/24t granny chainring, and if you find yourself on those kinds of trails regularly, you will still want to go with a 3x10 drivetrain.

3x10
We regularly have customers questioning the need for a 30 speed mountain bike, and it is true that most riders going to the new 10 speed setups are more drawn towards a 2x10 setup. However, the smoother shifting offered by the tighter ratio cassettes is a step up in performance from existing 9 speed options, and with the introduction of the 11-36t cassette option, Shimano has shrunken the gaps between the chainrings on their triple cranksets to 42-32-24t instead of the older 44-32-22t. This makes front shifting faster and more accurate, with less of a jump between shifts.
  • Who it works for: Riders who spend most of their time in the middle 32t chainring and use most of the cassette range for the majority of their riding conditions. If you've got long, arduous climbs in your neighbourhood and couldn't live without a small chainring, don't believe the marketing hype and stick with a triple crankset for its versatility.
  • Who should avoid it: Anyone that finds a granny ring more useful as a paper weight than an actual gear. If you're a big ring smasher, you will love the higher ratio double cranksets such as the 42-28t option from SRAM or the 38-26t option from Shimano.
Note: For 29er's, All Mountain bikes and anyone riding terrain where a granny ring is essential, you can still have a 2x10 setup without having to go with a dedicated double crankset. The picture on the left is of a 10 speed XT crankset that has had the 42t chainring removed, and replaced with a bashguard. The conversion is relatively straight forward, as you don't require any new components. Aside from swapping in the bashguard, all you need to do is wind in the upper limit screw to stop the derailleur from moving past the middle chainring. The reason you would do this is if you find the big chainring on a triple crankset mostly useless for your riding, but really appreciate the 32t middle ring and having the small chainring for climbing. And 'hey presto'; a 2x10 setup that can easily be changed back to a 3x10 arrangement if you decide you can't live without your big ring.


1x10
Starting to increase in popularity due to the advent of wide-range 11-36t 10 speed cassettes, the single chainring setup is becoming more feasible thanks to the increased range offered out back. While single chainring setups have been around on DH and Freeride bikes for some time now, All Mountain and XC riders are starting to warm to the concept and appreciate the simplicity and improved chain retention offered. Remove the front shifter, front derailleur, additional chainrings and a few chain links and all you need to do is choose the right chainring size for your riding (32, 34 and 36t are most popular) and use some kind of chain device in lieu of the front mech (E*13 XCX as in photo), and you've got yourself a reliable and simple drivetrain solution.
  • Who it works for: Simpletons with big legs. If you replace your middle chainring about 5 times before any other chainring, there's a good chance a 1x10 drivetrain is all you really need for your riding conditions. The increased chain retention and snappier shifting from a shorter chain is noticeable on rough terrain and great for aggressive riders.
  • Who should avoid it: Like a 2x10 system, any rider who requires a low climbing gear will struggle with a single front chainring. Likewise, on most XC racetracks you will be pining for a 38t-42t big chainring that this option does not provide. If you have dodgy knees, you're best off with a drivetrain setup that has a low climbing gear.


While we understand that there are many confusing drivetrain options available to us these days, and it seems like each magazine or press release tells us to use a different setup that what the last one said, there are no doubts that there is a suitable option for your bike and your riding style. By going off previous experience, you can determine fairly easily what are the gears you really use, and what gears are mostly redundant for your riding. Don't be pressured into buying the 'macho' race-specific setups if you're not the racer type, as those gearing ratios will not be useful for 90% of riders out there.

If you like what you've read but have a few more specific questions about what groupset you want to fit to your new bike, or how to modify your existing setup to better suit your legs, by all means drop us a line or come into MMHQ in Brunswick to further discuss your available options. We would love to share our experience with the new 10 speed groupsets and help your decision making in getting the right setup for you.

Saturday, February 18, 2012

NZ Bound - Riding the Coppermine (Part 1)


Mining with Rubber
For anyone familiar with mountain biking around Nelson, there is one trail in particular that you will always hear being discussed in the days leading up to the weekend; The Coppermine. Having become firmly established in local mountain bike folklore, the Coppermine trail seems to achieve that magical balance of being physically challenging, having glorious singletrack as well as stunning views, whilst also making you feel like you're out in the middle of nowhere. Proper mountain biking. And it's not like Nelsonites don't have a huge range of amazing trails at their disposal, so putting the Coppermine up there as one of the best is bestowing it with a particularly envious reputation.


The appeal of this 40km loop is wide-reaching and draws in all kinds of folk including weekend warriors, super-fit roadies, downhillers, punters, trail enthusiasts and even travelling tourists. While you are climbing for the best part of 2 hours, it is a consistent gradient that allows you to get into a steady rhythm regardless of how fit you are and it is not uncommon to see grandparents and younger kids making the journey up.


The Coppermine loop is the complete circuit of the Dun Mountain Trail, which is a joint walking/riding track that snakes its way from just outside of the Nelson CBD up through the Brook Valley, around Fringe Hill and up onto the Coppermine Saddle that sits between Wooded Peak and Dun Mountain. This trail is based on New Zealand's very first railway that was designed to transport minerals from the Eastern slope of Wooded Peak back down to Nelson Port, which was about 21km in length. The railway followed a gradient of between 1:18 - 1:20, making it an ideal ascent for walkers and riders that allows you to steadily gain elevation without things getting too steep.


During its construction back in 1861, there were various stations or "houses" along the length of the railway line that contained horse stables, workshops for the carpenters & blacksmiths as well as accommodation for workers. The photo on the left is of the "Third House" that still remains today, providing a historic rest stop on your way up the climb, or even a spot to camp for the night if you're on a hike.


Breaking my Coppermine Virginity
Having only been in Nelson less that a fortnight, the few people I had met all seemed hellbent on recommending me to complete the Coppermine loop. I had ridden a few of the trails around Nelson and had quickly discovered that while the terrain was much steeper and more technical than I was used to, it was also some of the best riding I had ever experienced. To hear that there was a longer, better loop out there that had recently been awarded as one of NZ's "Great Trails" was a particularly salivating prospect. The first time I rode the Coppermine was with a local DH shredder called Jake on December 22nd, 2011.


Climbing up from 3rd House, the hardpack trail begins to get rockier and rockier, with shale and loose stones littering much of track around the many creek crossings. For those less technically-capable riders, it is quite common for folks to turn around at 3rd House and ride the Dun Mountain trail back down into Nelson. After having ridden the Coppermine about 5 times now, I honestly don't know how you could give up all that elevation when only a few km's further you have this view (photo right) to take in as well as one of the sweetest singletrack descents I have ever experienced.

Aside from getting rockier and more technical, the stretch between 3rd and 4th House also becomes more and more like a scene from Lord of the Rings, with moss-covered rock faces, large fallen tree trunks and leaf-litter covering most of the undergrowth. A couple of times I have ridden this section in an eerily low cloud line, and the shortened tunnel of visibility in front of you intensifies the sensation of being in the wilderness. That particular days riding was dotted with light showers that we were mostly protected from, but with wet precipitation covering all surfaces of the foliage that hugged the singletrack, it didn't take long for our gloves, shorts and shoes to become soaked with the rain water.

Past the site of 4th House, you burst out of the tree line into a rock-strewn landscape with low-lying tussocks and scree plants. This sharp contrast to the lush forest you were previously riding in could almost be drawn with a pen, and is the sign that you've arrived at the Mineral Belt. Winding its way in a distinct pattern across the mountain range and defined by the Dun Mountain Peak, the Mineral Belt is the reason the railway was constructed in the first place; initially to mine Copper, but later on to mine Chromite deposits. Because of the chemical makeup of the rock and soil, very little vegetation can grow on the Mineral Belt and is why it is sometimes referred to as a "lunar landscape". Riding the trail between Windy Point and the Coppermine Saddle, Jake and I barrelled over large 'n' loose rocks as we made our way to the 878m peak of the ride, occasionally losing the back tyre as it spun out from climbing out of a dip in the trail...

Check out my next blog update with Part 2. detailing the amazing Coppermine descent, as well as the recent Coppermine Enduro race I took part in that will be forever etched in my memory as one of the best MTB events I have ever participated in.

In the meantime, checkout the promotional video from the Coppermine Epic event below;

Coppermine Epic from bikeworks on Vimeo.

Tuesday, February 14, 2012

Who's thirsty? Huge new Camelbak range now in store and online


We've always been big fans of Camelbak hydration packs as riders ourselves, but we've taken things a step further by recently becoming an official Camelbak dealer. Those regular My Mountaineers will know we've been stocking a select few packs over the past 2 years such as the Mule and Lobo bags, but for 2012 we decided to expand the range to include additional sizes, Womens specific packs and a whole range of accessories for those chasing parts for their existing bladder.

We're particularly excited about some of the new packs such as the Charge LR pack (blue pack pictured) that features a brand new Lumbar Reservoir that positions the Antidote bladder around the lower half of the pack instead of lengthwise. It's designed to lower the centre of gravity of the pack while placing more of the weight onto your hips as oppose to your shoulders.
Check out the Camelbak Charge LR here.


Also part of the new range in stock is the female-specific Aurora backpack. It joins a line of 3 Womends Camelbak models that feature a more contoured harness that is designed to be more comfortable for ladies, particularly if wearing a sleeveless top. The models feature different sized bladders and storage volume, so you can pick the ideal pack based on your riding demands. Check out the Camelbak Aurora here.


As we are now stocking a bigger range of Camelbak hydration packs, we are able to pass on better pricing to you on all the new 2012 packs. The Mule is an absolute classic in the Mountain Bike lineup and features some new tricks and improvements for 2012 to keep it on top. There are still 2 versions available; the standard Mule and the Mule NV. THe NV features a much better quality harness that provides a butt-load more ventilation that is a must for Aussie conditions. While the standard Mule is cheaper, we only choose to stock the NV model as we believe it is a much better quality pack. With a recommended retail price of $179.95, we are able to offer the Mule NV at a lower price of $154.95. Like the rest of the website, we provide these lower prices all year round to all of our customers; no waiting for unnecessary sales, no need to worry about others getting a cheaper price than you - just great pricing all the time with no gimmicks.


We have also taken delivery of a range of the Camelbak bottles. While some MTB folk will scoff at the idea of not using a hydration bladder, a bottle can often be a better choice, particularly for after work rides where you don't need a huge reservoir of water. Taking their bladder technology to the world of bottles, the Podium water bottles use a BPA-free construction with the same HydroGuard lining used in the bladders for taste-free drinking.
Our pick is the Big Chill Podium bottle on the right, as it uses a dual-layer insulation system for keeping fluids cooler. This is the perfect bottle for Summer days, as there is nothing worse than going for a swig of water that turns out to be luke warm, urgh.
The Podium water bottles start from $17.95 and you can check them out here.


For those already using a Camelbak, we have replacement bladders and bladder accessories for keeping the scunge away and breathing some life into your old pack. The entire 2012 Camelbak range utilises the redesigned hydration bladder called the "Antidote". The same bladder is now also available on its own so you can fit it to your existing pack. Aside from being lighter and slimmer, the Antidote gets what we reckon is a revolutionary closure lid that locks shut in a 90 degree turn. The amount of times we have over-tightened the closure lid on the previous Omega bladder and have battled to try and get it unstuck is not worth mentioning here! The hose is now also removable from the bladder and makes refilling/cleaning much, much easier.

Checkout more info on the Camelbak Antidote Bladder here.


Though with that lovely new bladder, you're going to want to keep it clean and in tip-top condition right? Camelbak make a number of cleaning solutions for keeping your reservoir fresh and free of contaminants. We always store our bladders in the freezer between rides to stop any bacteria from growing, but it will still find its way in there eventually and when it does, these cleaning tablets will kill and remove any nasties. Simply dissolve in water and clean out the bladder and hose with a brush kit, then rinse and hang out to dry completely before using again.
The tabs come in an 8pk for just $19.95 that will give you 2-3 years worth of cleaning if you clean out the bladder every 3 months.

If it's time for a new hydration pack or you just need to spruce up your existing reservoir, we've got a great new range available from Camelbak to suit every rider out there. Check em out in store or online here; Hydration & Bottles.

Sunday, February 12, 2012

Drivetrain Wars - The 10 Speed Battle of SRAM vs. Shimano (Part 1)


Looking back on the past 24 months in BikeLand, it seems as though every fortnight a new revolutionary product is hitting the market, such is the pace of advancing technology in modern day mountain bikes. It kinda feels like we’re being bombarded by new bottom bracket standards, steerer tube sizes, drivetrain options, thru-axles, carbon fiber layups and suspension technology, making it hard to sift through the marketing spiel to see what is actually going to improve your riding. At the end of the day, a lot of these innovations are genuinely better than the component they replace, but whether it means anything to you, your riding style, riding conditions or budget is an entirely different kettle of fish.

Today’s example; The 10 speed Drivetrain.


10 Speed – what’s it all about?
While road bikes have been using an extra gear for a few years now, Mountain Bike 10 Speed was only introduced by the impressive XX groupset from SRAM back in late 2009. The 10 speed drivetrain shook up a somewhat stagnant market by adding an additional cog to the cassette to rework gearing ratios. The big push from SRAM was to use a double crankset up front instead of the usual triple, made all the more viable by a wide-range cassette out back. Instead of 11-34t ratio used on 3x9 drivetrains, the new 2x10 system got a big 11-36t cassette ratio, allowing for a similar high and low gear, with more usable shifts in between (think of all the gearing overlaps there are in a 3x9 system). What we are seeing now are a whole new range of drivetrain setups with both triple, double and single front chainring options, with riders being able to select the perfect setup for their riding style and track conditions.
However, along with a heavy marketing push, we’re also seeing many riders on setups that aren’t suited to their local trails or riding style.

Aside from gearing ratios, there are 2 other advantages of a 10 speed drivetrain. The first is smoother shifting, as the extra cog in the cassette provides smaller changes between each sprocket size, allowing for an easier transition for the chain between gears. The second is a stronger chain (converse to what many think) as the rollers of the chain are shorter than on a 9 speed chain, resulting in less flex and a higher torque rating. Sure you can still bust a chain from mis-shifting, but overall they’re stronger and the wear rate appears to be no different from 9 speed options, if not slightly better.

SRAM
Being the purveyor of 10 speed, SRAM have certainly gone deep into the new platform, with 5 different groupset levels available from the World Cup XX, down to the entry-level X5 groupset. While SRAM are still making triple cranksets, they believe that with the new 11-36t cassettes out back, most riders can benefit from downsizing to a double crankset to reduce front shifting and are really pushing the whole 2x10 shebang. However, up until now the available chainring sizes for their 2x cranks have been a little tall for our liking, making us recommend triple cranksets for weekend warriors, 29er riders and those frequenting steep terrain (the smallest double chainring option being 39/26). For 2012, SRAM have recognized that some of their gearing options were too high for all but XC riders and racers, and so have introduced new 2x chainring ratio options as an aftermarket upgrade (such as a 38/24 option).

SRAM XX: Superlight and super trick parts that make up SRAM’s top-tier groupset.. Lots of carbon and Titanium, and the CNC machined cassette is a real work of art. Available crankset ratios include 39/26t and 42/28t, with the cassette coming in both 11-32t and 11-36t.

  • Buy Me: If you’re building the ultimate lightweight bike and want the best there is.
  • Don’t Buy Me: If you’re not XC racing and you require lower gearing options.

SRAM XX Groupset 2x10 Speed


SRAM X0: Not a whole lot cheaper than XX, but many similar technologies in a package for more aggressive riders. Sweet carbon cranks, punchy trigger shifters and a bomber rear derailleur that is available in 3 cage lengths. Also available for 2012 is the X0 DH groupset with specific cranks and rear derailleur.

  • Buy Me: If you have a carbon fetish and want bulletproof and lightweight
  • Don’t Buy Me: If you’re on a budget and need to spend money on other thing…such as food.

SRAM X0 Groupset 2x10 Speed

SRAM X0 3x10 Groupset

SRAM X0 DH Groupset 1x10 Speed


SRAM X9: Excellent value gruppo with trickle-down technology from the XX components. Not quite as slick and punchy in shifting as its bigger brothers, but hollow alloy cranks are stiff and overall weight is very good.
You can get a triple crankset and the double in both 39/26t and 42/28t following the X-Glide 1:1.5 ratio for uber-fast shifting up front.
  • Buy Me: If you like chunky SRAM shifting and love the 2x10 concept.
  • Don’t Buy Me: If your main concern is weight – you’ll have to go higher up.

SRAM X9 Groupset 2x10 Speed

SRAM X9 Groupset 3x10 Speed


What do you think of the whole 10 speed movement? Is it as good as your previous 9 speed drivetrain? Do you think SRAM have the 2x10 market stitched up or is this one big marketing fad you want to avoid? Let us know what you think and leave a comment below.

Tune in next time for our in-depth look at offerings from Shimano, as well as other drivetrain options currently spreading into the market.

Saturday, January 14, 2012

NZ Bound - Riding the Rameka Track

Stepping out of the minuscule Nelson Airport after a rain-delayed flight on a very small aeroplane, neither Suzie or myself quite knew what to expect of our new life at the top of the South Island in New Zealand. While we had heard a few stories and opinions about what we should see, which areas were prettier and where to find good coffee, our preparedness consisted of emailing our Kiwi friends to have them pick us up on arrival and organising to stay with them for a few days. With both of us keen on spending a couple of lazy weeks exploring the local area for both recreation and later employment, one thing I was very sure of was that I was going to be doing a lot of mountain biking.
On the way from the Airport through the driving rain in a tiny Lanica Stratos, Carl casually informed me that he had organised a group shuttle ride on Sunday in 3 days time. Although a supposedly cross country ride, "steep and rough" was his description, followed by; "what sort of bike do you have again?"
Over the next few weeks I was to learn that "Cross Country" in New Zealand means a very different thing...
Nelson is a smallish town of about 50,000 people, though swells over Summer under the weight of tourists, travellers and Kiwis holidaying in one of the country's favourite destinations. Mountain biking is incredibly popular here, mainly due to the fact that it takes 10min from the CBD to get to the local trail head. Situated next to the sea with scaling mountains on the other side, the riding here is very natural with steep & rough trails winding through indigenous forests and pine plantations.


The Rameka Track is a famous mountain bike trail that leads from the top of Takaka Hill on the other side of the bay from Nelson. Meeting at Carl's shop at 8am on Sunday morning, a Land Rover trooper rolled into the carpark towing an impressive home-made trailer on the back, ready to take us to our startpoint. After chatting with Warwick (the experienced owner of 4WD E-Tours) while loading the bikes onto the trailer, I quickly got the impression that he possessed much wisdom of the local area and seemed to know the trail network like the wrinkles on the back of his hands. Bearing in mind his long mountain biking history, it was with confidence that I would ask him where the best place was to get coffee in Nelson. "Ah, I know just the place on the way!" Warwick exclaimed, while proceeding to word me up on the car ride about some the best coffee and eateries around Nelson - valuable local information indeed. Stopping in Motueka at a place called the Toad Hall, my empty stomach called out for a breakfast muffin to go with my flat white as I had neglected to eat anything before heading out the door earlier that morning. The first photo was taken from our coffee stop looking out to Nelson on the other side of the Abel Tasman bay, while behind me loomed our destination of Takaka Hill, with some 790 metres of elevation between us.

I had been warned about the driving in New Zealand. Mostly about the , but also about the narrow passing lanes and. After living here for 3 months, I would also like to add poor driving skills on behalf of most Nelsonians to that list. There are some interesting 'give-way' concepts in the NZ driving laws that had us second guessing ourselves regularly, but Carl quickly put our minds at ease; "Don't worry about it, the locals don't even know what the rules are". The drive up Takaka Hill is nothing short of epic, with super tight switchbacks, 15km/h speed restrictions and Britz hire campervans being driven by angry tourists trying to get used to being on the left side of the road. While the coffee and muffin sloshing around inside my tummy served to remind me that I was hungover, Warwick's clear confidence in driving the familiar terrain showed no signs of us taking it easy around the cliff-hugging corners and I wouldn't have been surprised if he had pulled out a bandana to put over his eyes to make it less boring.
Finally arriving at the carpark, though slightly paler than before, we unloaded our gear to begin the 17km Canaan Loop that traverses the plateau around the top of the Takaka mountain range.

Recently re-furbished by the Deparment of Conservation, the Rameka Trail and Canaan Loop are both glowing examples of the amount of time, effort and money that goes into building and maintaining mountain bike trails in New Zealand. While Kiwis are blessed with amazing terrain and elevation, they are also fortunate to have support from both government and local resources to build and ride some amazing trails. The walking path opened into some loose and rough singletrack as we began the loop, crossing a number of creaks and rocky wash-outs that kept your concentration up. Around the plateau it was mostly scrubland and made for some fast and fun riding to warm us up for the main ride. Returning to the carpark to the smell of sausages being sizzled on the gas stove, Warwick put on some more coffee to fuel us before the descent.
The Rameka Track is approximately 2 hours of downhill riding down into Takaka, where you lose 700 metres of elevation winding your way down through beautiful native bush, pine plantations and farmland towards the bottom. As we began to roll down it became apparent that Carl's description was particularly accurate, though while only steep in sections, the majority of the singletrack was rough, root-strewn and leaf-littered and separated by rocky creak crossings that had you picking your line to avoid dipping a foot down into icy cold water. While I certainly enjoy riding groomed man-made mountain bike trails thinking I'm Brian Lopes, there is a certain amount more satisfaction in riding natural trails that make you feel like you're the only human around for miles. The challenge of scaling technical climbs either by bike or by foot, then trying to find the smoothest line through streaky roots and patches of soft loamey mud can not quite be replicated at a mountain bike park.
Breaking out into the sunshine towards the bottom of the hill with achey wrists and ankles, I was almost in disbelief at just how good the trails were that we had just ridden and how much elevation we had both gained and lost in the space of a few hours. Arriving at the carpark in Takaka to a cold Heneiken from Warwicks extended arm, my first mountain bike ride in New Zealand was sure to set the bar very high. However, the combination of technical trails littered with either roots or baby-head rocks, steep switchback descents and changing bushland around us has thus far proved to be an excellent example of the local riding to be had.
I think it goes without saying that I will find it very hard adjusting to living in Melbourne again...